Every bowhunter strives for consistency and accuracy.
Their Objective
Whether it’s practicing on the target or shooting on the animal, we do everything possible to make sure that the arrow finds its own target. But small deviations in shape or alignment can have a disastrous effect on accuracy.
Any degree of inconsistency is magnified as the arrow travels downrange, moving further and further off of its intended course with every passing yard.
Anchor Point
The “anchor point”, or more properly – anchor points –are reference marks that can increase consistency (and therefore accuracy) for every shot.
Without proper anchor points, the release hand is free to “float” while at full draw, which will cause the arrow to deviate in a myriad of directions.
Using anchor points does not ensure that the bowhunter is setup with proper shooting form or alignment; they simply ensure a consistent position is used for every shot.
And in the end, consistency is king.
An archer with a 100% consistent, yet imperfect form, is more effective than an archer that uses picture-perfect form some of the time.
Identifying Anchor Points
Anchor points can vary from archer to archer, but there are three general criteria that bowhunters should use when identifying and selecting their anchor points…
Anchor points must be…
- Identifiable
- Repeatable
- Comfortable
These three aspects of good anchor points are inextricably connected. After all, an anchor point cannot be repeated if it is not able to be easily identified, nor comfortable to maintain.
If the bowhunter has to twist, turn, or contort themselves to achieve proper anchor points. Then they are either practicing incorrect form, are not fitted to their bow properly, or are simply attempting to use incorrect anchor points.
Common Anchor Points
A simplified understanding of an anchor point has historically been identifying where the archer’s hand meets their face while at full draw.
In traditional archery, this has often meant that the shooter’s index or middle finger rests somewhere near the corner of their mouth.
Hand-to-face contact is a great starting point – but remember that the average bowhunter (shooting a compound bow with a sight, and using a release aid) should strive for multiple anchor points.
Here are some of the common anchor points that are used…
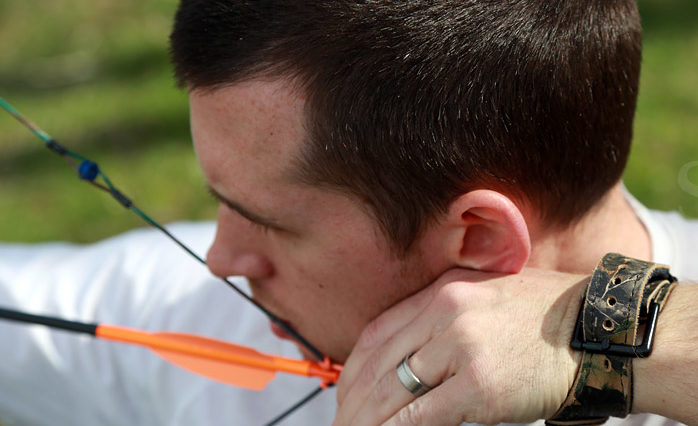
Release-Hand Contact
This is arguably the most important anchor point for the bowhunter. Depending on the type of release aid that they use, the hand may contact the shooter’s face in a variety of ways.
The goal with this anchor point is to be very specific and identify the exact part of the hand that contacts a specific spot on the face, jaw, or neck.
Bowhunters that use a release with an index-finger trigger will often have the last knuckle of the index-finger somewhere back near the bottom of their ear lobe.
Some may stretch it even further and anchor with a specific portion of their hand in contact with an exact spot on their neck.
Shooters that use a handheld release, such as a thumb-trigger or back tension release will often look for a specific knuckle, or gap in-between knuckles, to rest at a specific place on their jawline.
It is important to remember that the bow’s draw length setting, as well as the length of the release aid itself, are critical factors when determining the release-hand position.
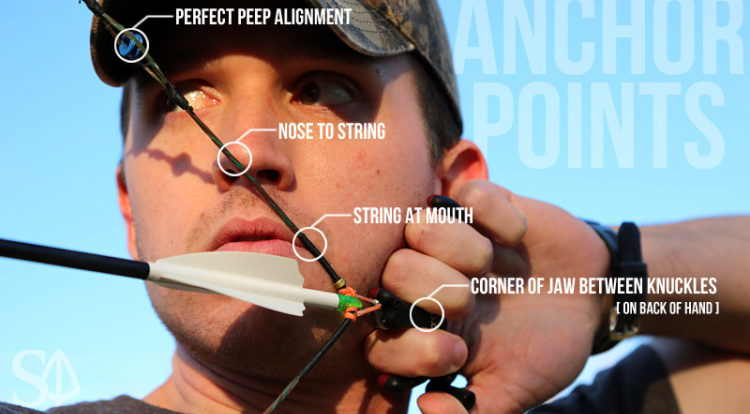
Nose to String
An ideal anchor point to supplement release-hand contact is to have the bow’s string lightly touch the archer’s nose when at full draw. This is anchor point is made possible when the draw length and string angle of the bow fit the archer’s form.
This anchor point isn’t for everyone. In fact, striving to make nose-to-string contact can often lead to bad form, if the archer does not fit the bow’s geometry in a way that makes this anchor point easily attainable.
This is an especially difficult anchor point to achieve naturally and comfortably when an archer with a longer draw length is using a bow with a shorter axle-to-axle length – which produces a very acute string angle.
String to Mouth
This anchor point is commonly used in conjunction with a “kisser button”.
String-to-mouth contact, just like nose-to-string contact, is dependent upon the draw length and the angle of the bow’s string at full draw.
This anchor point has become less common with the current trend of shorter axle-to-axle bows, but it is still a very effective way to ensure consistent alignment at full draw.
When this anchor point is used properly the bowstring should pass by the corner of the archer’s mouth, and by adding a kisser button or nock on the string, the archer can get have a physical point of contact.
Peep Alignment
Peep sight alignment isn’t a physical point-of-contact anchor point, but it should be part of the overall strategy in ensuring consistent form from shot to shot.
The goal with peep alignment is to eliminate the need to “getting into position” at full draw.
If the archer closes their eyes, comes to full draw, and ensures the rest of their anchor points are where they should be, then the peep should be properly aligned each and every time.
If the shooter’s anchor points are doing their job, there should never be a need to twist, bend, or otherwise align the neck and head to see through the peep clearly.
Finding your anchor points is a process of experimentation and may require adjustments in your bow’s draw length, peep height, release setup, and even shooting form.
Strive for anchor points that are easy to identify, natural to repeat, and comfortable to shoot with.
What anchor points do you use?