 Anytime that I get new arrows, a new rest, or am setting up a bow for the first time, I go through the process of “walk back tuning”. This tuning method is incredibly simple, but it is of critical importance for good arrow flight.
If you walk back tune before you try and “sight in” your bow fully, then you will save yourself a lot of time and frustration.
Walk back tuning is also the precursor to broadhead tuning, which we will cover soon.
The last tuning method that we discussed was paper tuning. Paper tuning helps us set our nock height, center shot, and verify that our arrows are properly spined.
If you are new to setting up your bow, or you are setting up a particular bow, rest, or arrow combination that you are not familiar with, then you should definitely paper tune before you walk back tune.
The “What” and “Why” of Walk back Tuning?
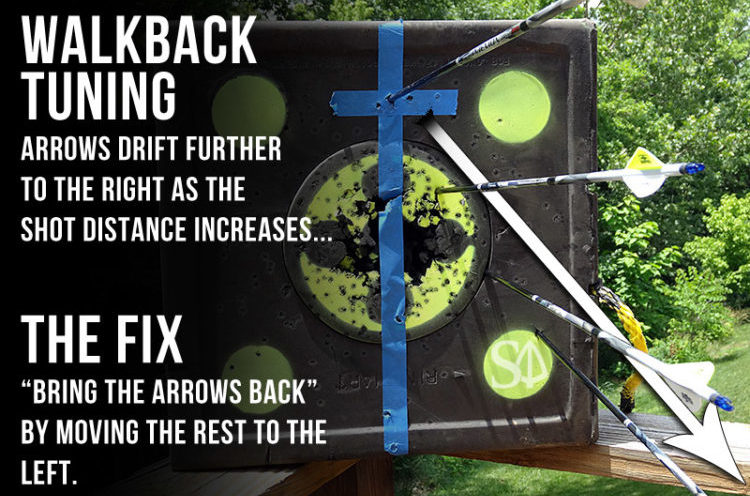
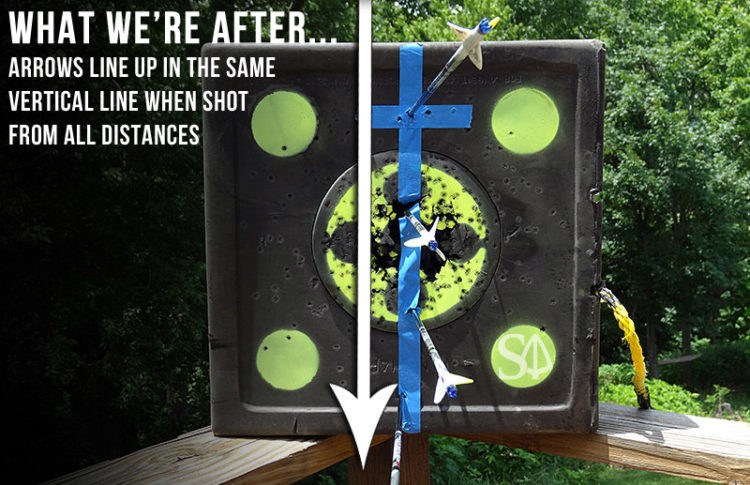
Walk back tuning is the process of shooting arrows at a single point on your target using one fixed sight pin from a range of distances. The reason that we walk back tune is to ensure that we have our bow’s center shot set properly, and that we are getting clean, consistent arrow flight.
Make a line down the center of your target, from top to bottom, ensuring that is running straight and plumb. I use blue masking tape for this. Create an aiming point at the top of your target by adding a horizontal line, which forms an intersection point to aim at it. Sight-in your bow at 20 yards, being sure to fine-tune the horizontal adjustment so that you are hitting perfectly and consistently inline. Don’t touch your bow sight. If you are using a slider-style sight, leave it in a fixed position. If you are using a multiple-pin sight, don’t worry about sighting-in or using anything but your top pin. Shoot, walk back, repeat. Start at 20 yards and shoot an arrow into the intersection point at the top of your target. Step back to 30 yards, and using the same pin and aiming point, shoot another arrow. Step back to 35 and repeat. Continue shooting an arrow from increased distances until the arrows begin to hit at the bottom of your target, or until you feel like you have reached your max effective shooting distance. Analyze and Adjust. Analyze the arrows in your target. Do they consistently move further left or right as you shoot from further distances? Sight and Shoot. Return to 20 yards and shoot again, adjusting your sight to compensate for the changes that you made to your rest’s center shot. Once you have your sight perfectly dialed-in, continue to repeat the process until you get the perfect vertical lineup of arrows when walking back and shooting from multiple distances. That’s it! Let me know if you have any questions.How to Walk back Tune Your Bow
 Walk back tuning is best performed with a larger target. Try to use one that is at least 20″ tall, and preferably just as wide.